

How To Remove Honda Door Panel
Honda Pilot Interior Door Panel Removal Guide
How to have off the plastic interior door panels in a 2d generation 2009-2015 Honda Pilot to upgrade the speakers.

2022 Pilot Door Panel
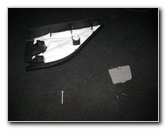
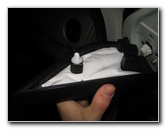
Pry Off Sail Panel
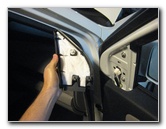
Sail Console Removed
Owner's of other Honda or Acura vehicles such as the Odyssey, Insight, Ridgeline, CR-V, Fit, Civic, CR-Z, Crosstour, Accord, MDX, RDX, RLX, TL, TSX and ILX may as well find these DIY instructions to be helpful.
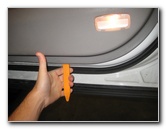
The tools needed to remove the door panel include a small flathead screwdriver, a Phillips head screwdriver and a large flathead screwdriver or a plastic automotive console pry bar.
To remove the door speaker, you'll need an 8mm socket with a 1/four" bulldoze ratchet or a Phillips head screwdriver.
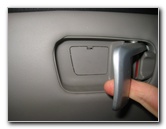
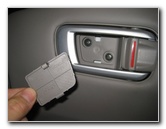
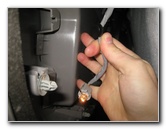
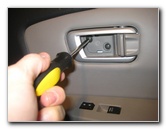
Door Opener Handle
Push Down Release Tab
Spiral Cover Removed
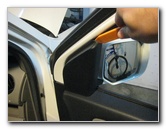
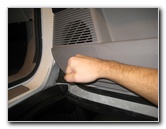
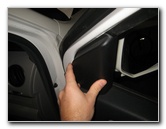
Gently pry off the triangular shaped sail panel at the height inner corner of the door console with a plastic automotive pry bar tool or a flathead screwdriver.
On some models, the sail panel may contain a tweeter speaker that needs to be asunder.
Set the plastic sail panel aside in a safe identify.
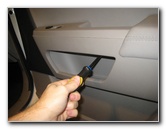
Then move to the door opener handle and press downward the release tab on the trim piece to remove the spiral cover.
Set the screw cover aside in a safe place.
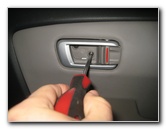
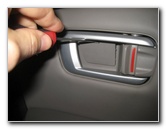
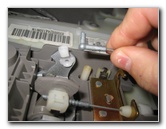
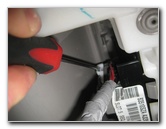
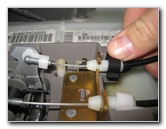
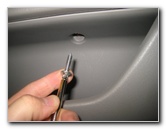
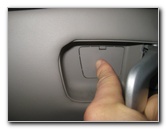
Loosen Counterclockwise

Remove 2nd Phillips Screw
Spiral Below Armrest
Set the two screws aside in a safe place.
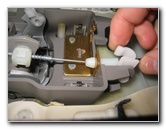
The third and final screw that needs to be removed is located just below the armrest.
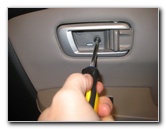
Remove Phillips Head Screw
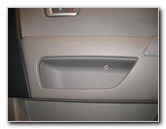
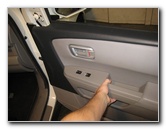
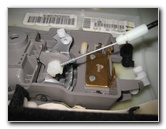
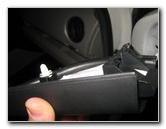
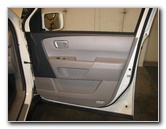
2 Panels & 3 Screws
Pull Out Bottom of Panel
At this indicate, you should take removed 3 screws, one plastic spiral comprehend and the sail panel.
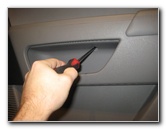
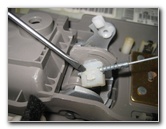
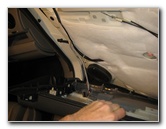
Insert the plastic automotive pry bar tool in between the bottom edge of the door panel and the metal door frame.
Firmly pull out the lesser border of the door panel to undo the plastic pop rivet friction fasteners.
Release Plastic Pop Rivets
Courtesy Footstep Light
Slide Out Wire Fastener
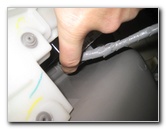
Look backside the bottom part of the door panel and remove the courtesy step light bulb socket by rotating information technology 1/4 turn counterclockwise.
Then slide out the blackness plastic fastener that secures the bulb wiring to the back of the panel.
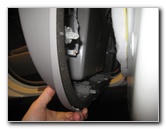
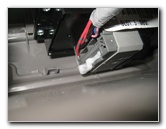
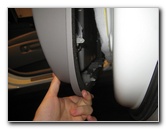
Lift Panel Off Door Frame
Two Cables
Pull Off Plastic Collar
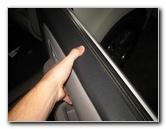
Tilt the summit edge of the door panel towards yourself and support the lesser edge with your legs.
The two metal cables attached to the back of the door panel operate the door opener handle and door lock rocker switch.

Rotate Out Cable
Pull Out Metal Terminate Piece
Release Plastic Neckband
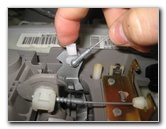
Pull the cable out of the metal bracket and swing information technology abroad from the door console.
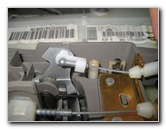
Pop off the small-scale white plastic collar and lift the metal elbow piece out of the socket.
Pull the white plastic "C" socket off the door opener cable.
Rotate Cable Away
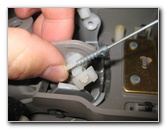
Pry Open up Plastic Clip
Lift Out Metallic Bar
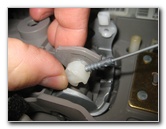
Gently pry open the plastic retaining clip that secures the barbed metal bar with a minor flathead screwdriver.
Lift the spinous metal bar out of the white plastic socket.
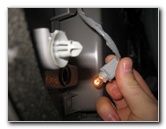
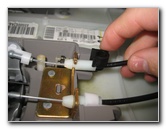
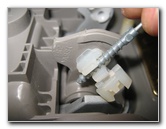
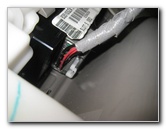
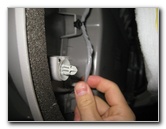
Switch Panel Ability Plug
Push Downward Release Tab
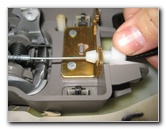
Swing Open Lever
Swing open the locking lever and slide the power plug straight out of its socket.
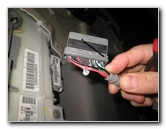
Remove Electrical Connector

Other View of Plug
Metal Door Frame
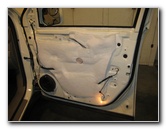
Set the plastic door panel aside in a safe place.
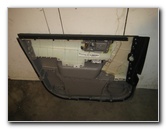
Plastic Panel Removed
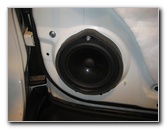
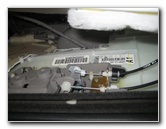
OEM Door Speaker
Hold Panel Near Frame
To remove the speaker, y'all'll need an 8mm socket with a 1/4" drive ratcheting wrench or a Phillips caput screwdriver.
The OEM forepart door speakers tin can be replaced with aftermarket speakers in the following sizes: 5 1/4" (5.25") and 6 ane/two" (six.5").
I'd recommend purchasing new speakers from Crutchfield since they usually provide any necessary power plug adapters, wiring harnesses and/or mounting brackets.
If you'd similar to reduce road noise and allow the new speakers to sound their all-time, apply Dynamat Sound Deadener to the metallic door frame
To replace the door console, hold it nigh the door frame and tilt the top edge towards yourself.
Push In Power Plug
Rotate In Latch To Lock
Re-Insert Metal Bar
Close the white plastic lever to lock the power plug in place.
Re-insert the barbed metallic bar for the door opener handle cable in to the white plastic prune.
Snap Closed To Lock
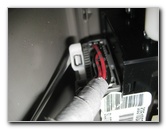
Plastic Collar In Bracket
Metal Bar In Socket
Pop the white plastic neckband virtually the end of the cable in to the metallic bracket.
Re-insert the metal elbow piece at the stop of the door lock switch cablevision in to its socket.
Snap the white plastic "C" collar over the metal bar.
Shut Plastic Collar
Push button Collar In To Bracket
Lower Panel On Frame
Close the black plastic "C" shaped collar over the cable.
Lower the top of the door panel on to the upper lip of the metal door frame.
Supplant Stride Light Socket
Line Up Plastic Popular Rivets
Firmly Tap In Fasteners
Re-insert the step low-cal seedling socket in to the housing and rotate it 1/iv turn clockwise to secure information technology in place.
Line upward the plastic pop rivets on the back of the door panel with their corresponding holes in the metal door frame.
Firmly tap in the pop rivet friction fasteners all along the bottom edge and both sides of the door panel.
Re-Insert Arm Rest Screw
Tighten Screw Clockwise
Replace Door Handle Screws
Replace the 2 screws behind the door opener handle by turning them clockwise with the Phillips head screwdriver.
Tighten Screws Clockwise
Pop In Plastic Screw Encompass
Line Up Sail Console
Line up the 2 plastic hooks at the bottom edge of the sail panel with their slots.
Hooks On Lesser Edge
Push On Sail Console
Door Panel Replaced
Sit inside the SUV, close the door and verify that the door opener handle, door lock rocker switch, power door lock switch and power window switch all still work properly.
For more, delight check out my other 2009-2015 Honda Pilot DIY Repair & Maintenance Guides.
Source: https://www.paulstravelpictures.com/Honda-Pilot-Interior-Door-Panel-Removal-Guide/
0 Response to "How To Remove Honda Door Panel"
Post a Comment